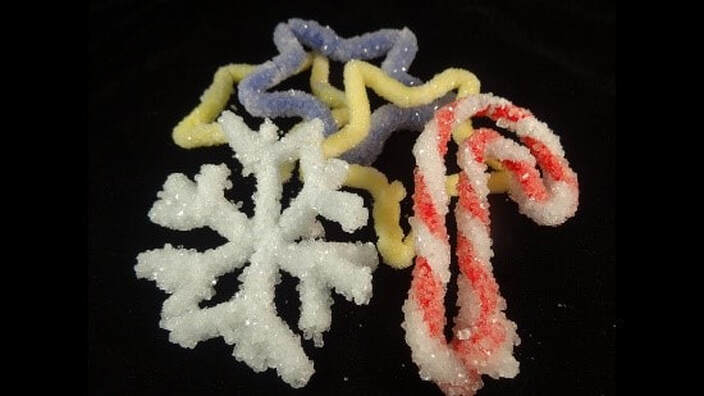
 Today we are going to share with you, how you can teach science to young students in a fun and interactive way. In this blog you will learn to make chemical snowflakes in your classroom. Children will be excited! With these snowflakes you can decorate your classroom, Christmas tree, Christmas cards, etc. However, you are not limited to only snowflakes. It’s possible to make other structures as well. Just let imagination run wild. 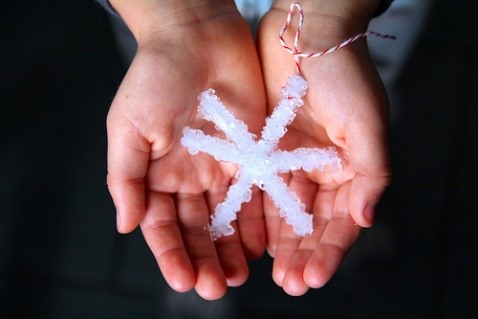 No, this is not a real snowflake on the photo. It is a super beautiful snowflake made of borax. You can do them in various colours. When light hits these snowflakes they shine like thousands little diamonds. Real beauties! Because these are special snowflakes, they will not melt in hands! Keep in mind that this experiment takes 2 days, because snowflakes need 24 hours to form. It is best, if you craft snowflakes on the first day (you can allocate only 1 hour or more, depending on your choice) and then leave them overnight in suspension to form. The next day you only take them out, leave snowflakes to dry and hang them on the Christmas tree. So, how do you make these snowflakes? Almost everything you need you can find at home/school or buy at the nearest grocery store: Materials for each student:
Materials for whole groups to share:
Safety first Before the start teacher has to explain safety instruction. Pupils will be working with borax themselves, so they have to know what it is and how to avoid injuries when using it. After working with borax pupils must wash their hands with soap. Borax (sodium tetraborate decahydrate) is a natural mineral salt, usually used as a natural bleaching agent or natural cleaner. Like every cleaner it has to be kept out of reach of children, and it can only be used under adult supervision. Borax, the same as washing powder, cannot be consumed and it can irritate the skin, so we have to wash our hands carefully with soap after we finish working with it. And now – let’s begin our STEAM experiment! Pupils take scissors, pipe cleaners… and action! They can let imagination run wild to do the decorations. They can do snowflakes, sticks, stars, curved sticks,… You can also help your pupils with different shapes of snowflakes for ideas. The only limit is the size of the glass. Decoration should be small enough to be hang in the glass. Meanwhile, teacher can prepare hot water. The water needs to be very hot. If the water from the tap is not hot enough use water kettle. After all the snowflakes are made each pupil adds borax detergent in the glass (5 table spoons) and teacher adds hot water. If you want coloured snowflakes, this is the time to add food colouring in the glasses. Pupils then attach the snowflakes to the string and string to the wooden skewer or pencil so the snowflake is hanging in the middle of the glass submerged in suspension. The snowflake must hang freely, not touching glass at sides or in the bottom, and must be left undisturbed overnight. 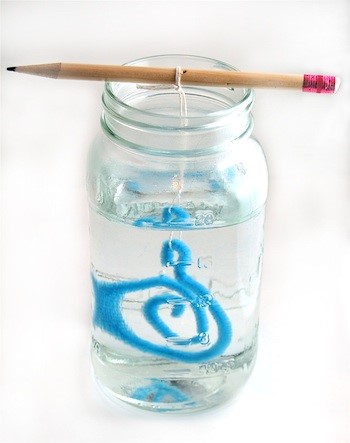 The next day pupils carefully lift the snowflakes from glasses and place them onto paper towels on the table. Let the snowflakes to dry. The science behind the experiment
This experiment gives you a great starting point for the discussion about why did the snowflakes formed. The main goal of this experiment/lesson is to learn about suspensions. Pupils usually know the terms liquid and solution but it is difficult for pupils to comprehend the term suspension. By making crystal snowflakes they will quickly understand. And what is it that happened? We have added a lot of borax in the water and therefore, it could not dissolve completely, forming suspension. If we would look carefully, we could see the solid particles of borax on the bottom of the glass. These solid particles started to attach to pipe cleaners and create our beautiful snowflakes with a lot of crystals, formed overnight, when the suspension was slowly cooling down. You can also make these adorable snowflakes with younger children. When they can use the scissors and create pieces of art with pipe cleaners, they are ready to do snowflakes. Teacher can prepare the borax suspension in the glasses, so children just create the decorations. Teaching science does not have to be always serious. Through fun experiments like this one you can teach pupils without them even realising they are learning. At the course “Science for primary school children: When complicated becomes fun and easily understandable” you can learn more about how to prepare lessons like this. Have a lot of fun creating chemistry crystal snowflakes! author: Teja Bajt, M.Res., is a biologist with a master of research degree in molecular and cellular biology, awarded from University of Birmingham, United Kingdom. She works for Primera group as trainer of the Science for Primary School Children course. |
primeraWe empower teachers so they can do their job best. Categories
All
LINKSPrimera's practical handbook for writing high quality Erasmus+ mobility projects.
Pan-European Conference on Digital Education Facebook Community. Primera's FB page. Work with us on Erasmus+ KA2 projects: STEP Institute. |
 RSS Feed
Erasmus+ by Primera for teachersErasmus+ courses by Primera are dedicated to teachers who value evidence-based and practice-driven training in highly interactive international atmosphere.
OID Ljubljana: E10091479 OID Vienna: E10298896 E: [email protected] T: +386 1 320 28 43 Privacy Policy |
Navigation |
Stay tuned! |
© 2020 Skupina Primera Ltd. All rights reserved.